Docker Commit
Docker is an open-source container management service and one of the most popular tools of DevOps which is being popular among the deployment team. Docker is mostly used in Agile-based projects which require continuous delivery of the software. The founder, Chief Technical Officer, and Chief Architect Officer of the Docker Open source project is Solomon Hykes. It was launched in 2013 by Dotcloud since then it is the world’s leading software container platform. For more details about containerization using docker and its docker architecture.
How we can create our own customized Docker images and how we can push them to the Docker hub profile? It is good practice to push your images to the docker hub profile as you don’t have to create it again, and you can pull those images in your system as well as in the cloud with all your work saved in it.
Creating docker images is not a tedious task. We can create a docker image easily with a few commands. There are two ways of creating a docker image depending upon the purpose for which you want to create the image. The first method is using the commit command and another method is by using the Dockerfile concept. Know more details about the components of Docker ie, Docker images, and Docker File.
Now let’s start creating our own customized docker image using the commit command. Before going with our own docker image we should first set up and configure docker in our operating system. To learn more about how to set up docker you can refer to how to install docker. After successful installation let’s learn some of the docker commands.
What Is Docker Commit ?
The Docker Commit image is used to create a new image from the changes made to the Docker container. Docker commit can save the current state of the container in the form of a Docker image. Following is the syntax of the Docker commit command.
Syntax
docker commit [OPTIONS] CONTAINER [REPOSITORY[:TAG]]
-
CONTAINER: Name or ID of Docker container.
-
REPOSITORY: Name of the repository to which you want to push the docker image.
-
TAG: Tag the new image.
Options of Docker Commit
The following are the options of docker commit:
| Option | Description |
|---|---|
-a, --author |
Specifies the author name for the image |
-c, --change |
Applies Dockerfile instructions to the image |
-m, --message |
Specifies a commit message for the image |
--pause |
Pauses the container during commit |
-p, --pause-file |
Pauses the container using a pause file during commit |
--platform |
Sets the platform if not specified in the Dockerfile |
Examples of Docker Commit
The following are some of the examples of docker commit:
1. Commit with default settings
docker commit <container_id> <new_image_name>
2. Commit with Author Information
docker commit -a "Author Name" <container_id> <new_image_name>
3. Commit with a commit message
docker commit -m "Added new features" <container_id> <new_image_name>
4. Commit with changes Applied
docker commit --change="ENV DEBUG=true" <container_id> <new_image_name>
Docker Commit Vs Docker Push
The following are the differences between docker commit and docker push:
| Feature | Docker Commit | Docker Push |
|---|---|---|
| Purpose | Creates a new Docker image from the changes made in the Docker container | Pushes the built image to the remote repository |
| Functionality | Captures the current state of the container | Makes the image available for multiple users |
| Example | docker commit GFG GFG-Updated:latestGFG-Updated is created with the current state of the GFG container |
docker push GFG_Registry/GFG:latestGFG image is pushed to GFG_Registry |
Docker Commits To the Same Image
Follow the steps mentioned below to the commit the changes to the same image.
Step 1
Create a new docker image with the present state of running container with the help of following command.
docker commit [OPTIONS] CONTAINER [REPOSITORY[:TAG]]
Step 2
Tag the new image name with original image and push it to the remote repository.
docker tag <Custom_image name>:latest <Orginal_Image Name>:latest
How to Use Docker Commit?
A new image can be produced using the Docker commit command based on modifications made to an existing container. It is a practical technique to generate a fresh image that incorporates any adjustments made to a container, like adding new packages or changing files.
Note
Using docker commit we can create an image from the container.
Syntax:
docker commit <containerId/Name> <imageName>
Steps for Committing Changes to Docker Image
Now we will create our own image from the existing alex43/ubuntu-with-git:v1.0 image, and we will customize it with our needs, and we will upload it.
Commit a Container
-
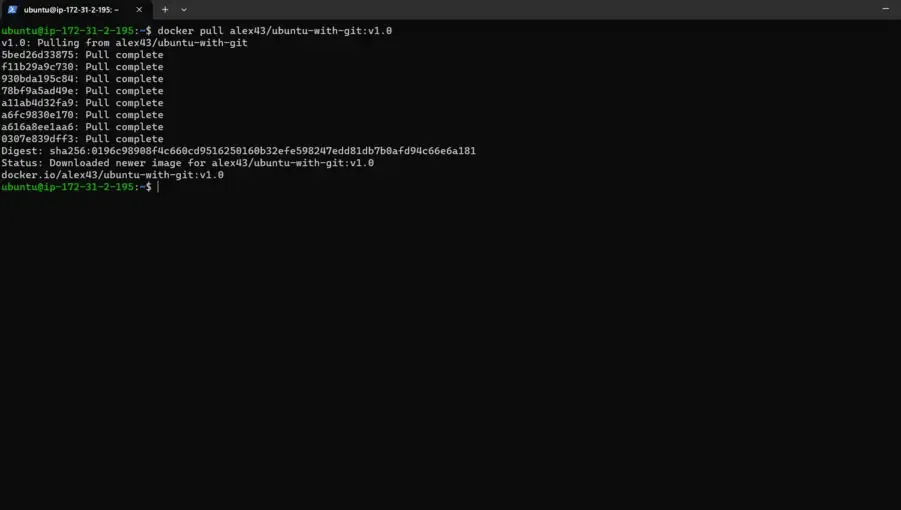
Step 1: Pull a Docker Image
The very first step is to pull the image as shown in the below image. Use the command and pull the image into your system as shown below.
docker pull alex43/ubuntu-with-git:v1.0
-
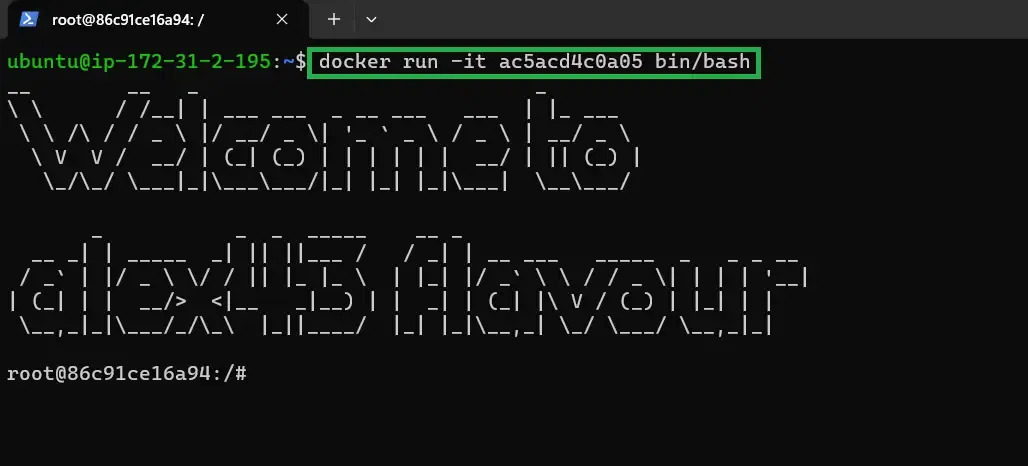
Step 2: Deploy The Container
After pulling the image run the container by using the below command where The “-it” flag instructs Docker to create an interactive bash shell in the container by allocating a pseudo-TTY linked to the container’s stdin. The command opens a new container and moves you to a fresh shell prompt so you can start working inside of it.
docker run -it <Imagename/ImageID> bin/bash
-
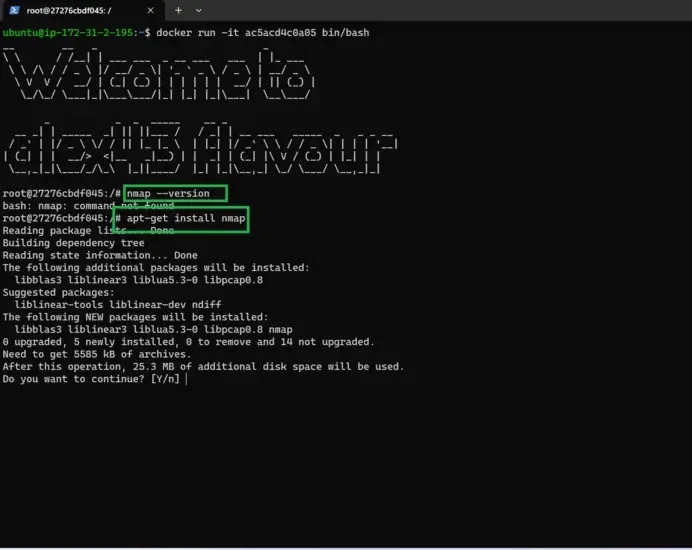
Step 3: Modify The Container
Know we are in the container we can install the required package or modify the image here we will try to install Nmap Software. Check whether the software has already been installed before you start installing it. with the following command.
nmap --version-
To install the Nmap use the following command.
apt-get install nmap
-
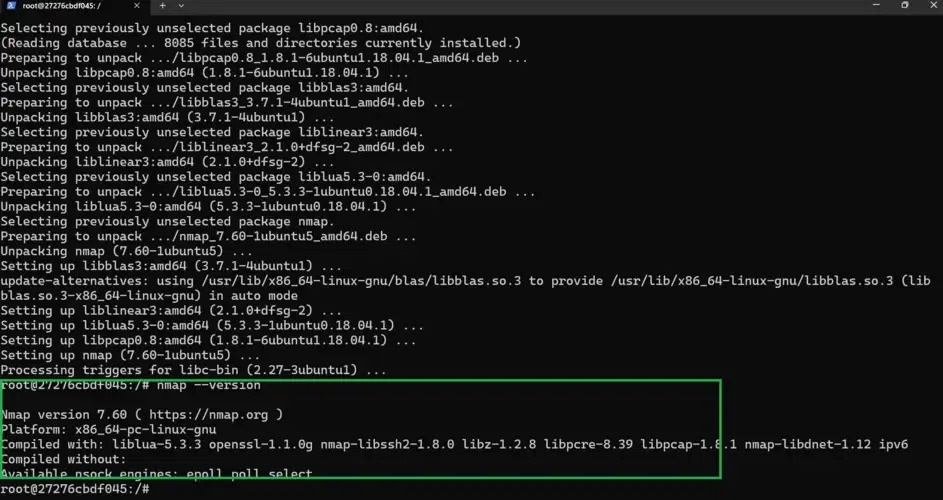
Once the installation is complete, confirm once more that the software was installed as shown in the example below. And exit from the container.

-
-
Step 4: Commit Changes to The Image
Lastly, commit the changes by using the syntax shown below to produce a new image.us the container ID and tag the new image with a new tag.
sudo docker commit [CONTAINER_ID] [new_image_name]
Execute the docker image ls after committing the image. We can see our recently committed image in this list.

Additional Options for Docker Commit Command
The first command is the pull command. This command will download/pull the complete operating system within seconds depending on your internet connectivity. The syntax is like, docker pull image_name. Here I am pulling alex43/ubuntu-with-git:v1.0 which is my own customized image.
docker pull alex43/ubuntu-with-git:v1.0
-
The second command is the run command which we will use to run the pulled image.
-
This command will launch my image and we will get an interactive shell/terminal of that image.
-
The syntax is like this -it is for an interactive terminal, –name to give the reference name for my image launched, and then my image_name.
docker run -it --name myos alex43/ubuntu-with-git:v1.0
-
The third command and the most important command for creating our own image is the commit command.
-
By using this command we can simply create our own image with the packages which we want from the existing image. The syntax is like, docker commit Nameof_RunningImage your_own_name: tag.
docker commit myos ubuntu-basicbundle:v1.0
- The fourth command is the tag command. By using this command we need to rename our image with the syntax username/image-name:tag. Before executing this command you need to create an account on the Docker hub and you have to give the same username which you have given in the Docker hub profile.
docker tag alex43/ubuntu-with-git:v1.0 alex43/ubuntu-basicbundle:v1.0
- The fifth command is the login command. By using this command we will log in to the docker hub account through our terminal and it is required to upload our docker image to the docker hub profile.
docker login --username alex43 --password your_passwd
- The fifth command is the push command. By using this command we can upload our own created docker image to the docker hub profile and can use it anywhere from our local system to the cloud by pulling it.
docker push alex43/ubuntu-basicbundle:v1.0
So these were the few commands with the concept which we will be using in this tutorial and I will be uploading one fresh image so that you guys can understand it in a better way.
Difference between Docker commit and Docker Save
The following are the difference between docker commit and docker save:
| Feature | docker commit | docker save |
|---|---|---|
| Purpose | Creates a new image from a container’s changes | Exports an image or repository to a tar archive |
| Use Case | Capture changes in a running container as a new image | Share or backup a Docker image or repository |
| Output | Docker image | Tar file containing image layers and metadata |
| Command Example | docker commit <container_id> <new_image_name> |
docker save -o <output_file>.tar <image_name> |
| Primary Focus | Image creation from container state | Image export for distribution or backup |
When to Commit New Changes to a New Container Image
By committing new changes to a new container image it will be useful in the containerization process where you can make an image from the changes we have done to a container. The timing of when to commit a new image depends upon a few factors:
-
Modifications are finished: Be sure that the modifications you’ve made are complete and function as intended before committing new changes to a container image. You can end up with an image that doesn’t perform properly or needs additional adjustments if you commit insufficient changes.
-
Consistency of Changes: It’s crucial to make sure that the changes you’ve made to the container are stable and won’t result in any problems when they’re deployed. Test the container rigorously to confirm that it performs as expected before making modifications to an image.
-
Frequency of Changes: Committing changes to a fresh container image more regularly may make sense if you frequently modify the container. This can lessen the chance of needing to roll back modifications if problems develop and ensure that each new version of the container reflects the most recent changes.
In conclusion, only commit fresh changes to a fresh container image once they have been fully finished, stable, and properly tested. When to commit new changes to an image depends on the frequency of changes and your deployment workflow.
Conclusion
In this post, we’ve discussed the significance of the docker commits command and provided step-by-step instructions with an example of how to use it. Docker commit is mainly used to commit the image from the running container in which we have done some modifications like installing some software or adding any variables in the container.