Kubernetes – Kubectl Delete
Kubernetes is an open-source Container Management tool that automates container deployment, container scaling, descaling, and container load balancing (also called a container orchestration tool). It is written in Golang and has a huge community because it was first developed by Google and later donated to CNCF (Cloud Native Computing Foundation).
What is Kubectl Delete ?
kubectl delete is a command used in Kubernetes to remove resources from a cluster. This command is part of the kubectl command-line tool, which is the primary interface for interacting with Kubernetes clusters. kubectl delete is used to delete resources by using a configuration file or by using the type of resource and the resource name.
kubectl delete ([-f FILENAME] | TYPE [(NAME | --all)])
-
Delete by Configuration File (-f FILENAME):
- -f FILENAME: Specifies a configuration file containing the resource definition(s) to be deleted.
- This mode allows you to delete resources defined in a YAML or JSON file. You provide the path to the file after the -f flag, and kubectl deletes the resources defined in that file.
-
Delete by Resource Type and Name (TYPE [(NAME | --all)]):
- TYPE: Specifies the type of resource to be deleted (e.g., deployment, service, pod, etc.).
- NAME: Optionally, specifies the name of the specific resource instance to be deleted.
- --all: Deletes all instances of the specified resource type across namespaces.
Example
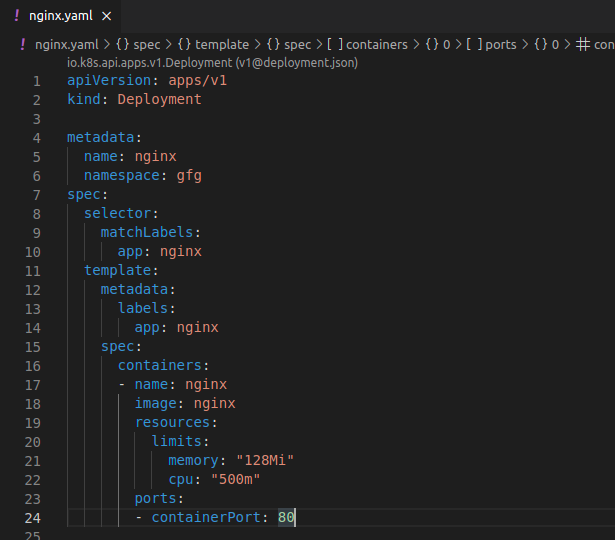
Suppose we are having Nginx web server deployment and Service running.

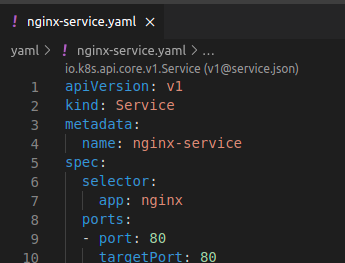
This is the nginx service manifest file.

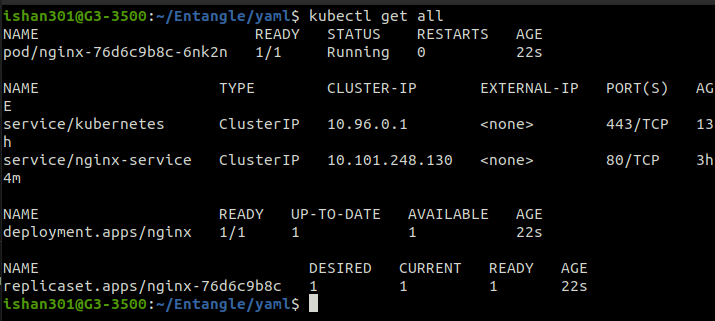
Here is the all running resources on the default namespace. Refer the below image for your reference.

Deleting Deployment
To delete the resources in Kubernetes, the kubectl delete command provides the flexibility. We can delete resources by specifying a configuration file or directly by resource type and name. For instance, to delete a Deployment named deployment_name, you execute the below command:
kubectl delete deployment deployment_name
Alternatively, you can also point your terminal to the file containing the deployment config file and use the command
kubectl delete -f your_config_file.yaml

Deleting Service
The same principle applies to deleting Services. To delete a Service named service_name, you use:
kubectl delete service service_name
Alternatively, you can also point your terminal to the file containing the deployment config file and use the command
kubectl delete -f your_config_file.yaml

Delete All Pods in All Namespaces
Deleting Pods Across All Namespaces
Use the kubectl delete pods command with the --all flag to indicate delete the all pods in your cluster.
kubectl delete pods --all
Excluding System Pods
Since deleting system the pods might destabilize the cluster, it’s prudent to exclude them. Instead of delete the pods in the kube-system namespace, explicitly delete deployments across all namespaces, except for critical system deployments.
kubectl delete deploy --all -A
Excluding Kubernetes System Namespaces With a for Loop
Suppose that you are assigned the task of managing a Kubernetes cluster’s regular maintenance. The goal is to eliminate obsolete deployments and pods from different namespaces while preserving the confidentiality of the system namespaces. Let us see how you can successfully accomplish this.
Deleting Pods Across Non-System Namespaces
You can start by executing a series of commands orchestrated through a loop.
for ns in $(kubectl get namespaces -o name | grep -v kube- | cut -c 11-);
do
  kubectl delete pods --all -n $ns;
done

Here’s what each step accomplishes:
-
Retrieve Namespace List: You receive a list for each namespace in the cluster through the use of kubectl.
-
Exclude System Namespaces: To be sure only those with user-defined namespaces are taken into thought, use grep to filter out any namespaces beginning with “kube-.”
-
Refine Output: With cut, extra characters have been eliminated from each line ensuring the names of non-system namespaces are the only characters left.
-
Iterate and Delete: You traverse each non-system namespace in a for loop and execute kubectl delete pods –all -n $ns to eliminate every pod within each namespace.
This streamlined approach safeguards system namespaces from accidental modifications while automates the cleanup process.
Deleting Deployments Across Non-System Namespaces
In the same way, you use the same procedure to deployment removal.
for ns in $(kubectl get namespaces -o name | grep -v kube- | cut -c 11-);
do
  kubectl delete deploy --all -n $ns;
done

Throughout iteration through non-system namespaces, with each iteration which includes kubectl delete deploy –all -n $ns, you can swiftly eliminate outdated deployments and preserve cluster hygiene without interfering with critical system components.
Delete All Pods in One Namespace
We can use the kubectl delete command with the –all flag and the -n flag to specify the namespace to remove all pods within this namespace. This is the instructions:
kubectl delete pods --all -n your-namespace

Put the name of the namespace from which you want to eliminate all pods in instead of your-namespace. Regardless of their status or labels, each pod in the specified namespace will be deleted with this command.
Delete All Pods in Multiple Namespaces
We can use a single kubectl command with the –all-namespaces flag and pods as the resource type to be demolished to delete all pods in all namespaces. This command speeds up the cleanup process by destroying all pods across all specified namespaces simultaneously. Before executing the command, make sure you have the appropriate permissions to avoid unanticipated results.
kubectl delete pods --all -n namespace1 -n namespace2 -n namespace3

The names of the namespaces from which you wish to remove all pods ought to be substituted for namespace1, namespace2, namespace3, etc. Each pod within each namespace that has been provided is going to be deleted by this command.
Delete Pods Forcefully
Utilizing the kubectl get rid of command when combined with the –grace-period=0 parameter allows you to swiftly destroy pods in Kubernetes. With a zero-second grace time provided by this flag, here will be no waiting period until pods end gracefully. Here’s how to achieve it:
kubectl delete pods --all --grace-period=0 --force

With this command, each pod in the current namespace will be forcefully removed. The -n contention can be utilized to denote the namespace if you want to get rid of pods from that namespace:
kubectl delete pods --all --grace-period=0 --force -n your-namespace

Enter the name of the namespace from which you wish to delete all pods in place of your-namespace.
Delete All Resources in All Namespaces
Removing every resource in every namespace is an extreme step that could have significant consequences. In the case that you must move on, here’s how to use kubectl to do it:
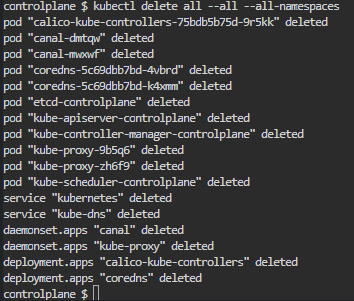
kubectl delete all --all --all-namespaces

This command will remove all resources (pods, deployments, services, etc.) in all namespaces. Make sure you completely understand the implications of continuing, as this move will affect all of the services and apps running within your Kubernetes cluster. Check you have enough privileges before running this command, and think about making backups or contacting your team to confirm.
Delete All Resources in One Namespace
To delete all resources in a specific namespace in Kubernetes, you can use the following kubectl command:
kubectl delete all --all -n your-namespace

To remove all resources, replace your-namespace with the name of the namespace. All resources (pods, deployments, services, etc.) within the specified namespace will be removed by this command.
Delete All Resources in Multiple Namespaces
To delete all resources in multiple namespaces in Kubernetes, you can execute the following command:
kubectl delete all --all -n namespace1 -n namespace2 -n namespace3

The names of the namespaces from which you want to eliminate all resources must be replaced for namespace1, namespace2, namespace3, etc. All resources (pods, deployments, services, etc.) within each namespace which is given will be destroyed by this command.