Kubernetes – Namespaces
Kubernetes Namespace is a mechanism that enables you to organize resources. It is like a virtual cluster inside the cluster. A namespace isolates the resources from the resources of other namespaces. For example, You need to have different names for deployments/services in a namespace, but you can have the same name for deployment in two different namespaces.
What are Kubernetes Namespaces ?
Kubernetes namespaces are the way of dividing the cluster resources between multiple users. They come with a mechanism of creating logical isolated environments within the same kubernetes cluster. Each namespace has its own set of policies, resources, and access controls making them ideal for the environments such as development, staging and production. provides better resource management, security and maintaining an organized structure within large kubernetes deployments.
Why use Kubernetes Namespaces ?
The following are the reasons to use kubernetes Namespaces:
-
Resource Isolation: They provide logical separation of resources, ensuring that different applications or teams do not interfere with each other within the same cluster.
-
Access Control: Namespaces enable fine-grained access controls, allowing administrators to define permissions and policies specific to each namespace.
-
Environment Segregation: They facilitate the creation of separate environments (e.g., development, testing, production) within a single cluster, improving organization and management.
-
Efficient Resource Management: Namespaces allow for better resource allocation and quota management, preventing any single application from consuming excessive resources at the expense of others.
Kubernetes Namespaces
When the kubernetes cluster is set up, at that time 4 kubernetes namespaces are created, each with some specific purpose. Those are as follows:
-
kube-system: System processes like Master and kubectl processes are deployed in this namespace; thus, it is advised not to create or modify the namespace.
-
kube-public: This namespace contains publicly accessible data like a configMap containing cluster information.
-
kube-node-lease: This namespace is the heartbeat of nodes. Each node has its associated lease object. It determines the availability of a node.
-
default: This is the namespace that you use to create your resources by default.
Although whatever resources you create will be created in the default namespace, but you can also create your own new namespace and create resources there.
Note
Avoid creating namespaces with the prefix Kube-, since it is reserved for Kubernetes system namespaces, and you should not try to modify them.

Namespaces and DNS
The namespace will isolate the services which need to have limited authorization and DNS will expose the application which you have deployed in the form of containers in some cases bother DNS and namespaces will work together. Kubernetes will assign the DNS to the namespace where our resources need to be exposed with the following naming convention.
<service-name>.<namespace-name>.svc.cluster.local
Here,
-
: indicates The name of the service associated with the resource. -
: The name of the namespace in which the resource resides.
Kubernetes Namespace Yaml
Kubernetes namespace yaml file is used to create the namespaces in Kubernetes where you can isolate the resources which are going to be deployed in the Kubernetes cluster.
Sample Kubernetes Namespace Yaml File
The following is the sample kubernetes namespace yaml file:
apiVersion: v1
kind: Namespace
metadata:
  name: <NameSpaceName>
  labels:           # Labels are key-value pairs (Metadata)
    <key1>: <value1>
    <key2>: <value2>
Example of Kubernetes Namespace
By the following yaml manifest file, the name of the namespace will be “test-ns” and the key-value pair will be “team: testing team”
apiVersion: v1
kind: Namespace
metadata:
  name: test-ns
  labels:
    team: testingteam
Create New Namespaces
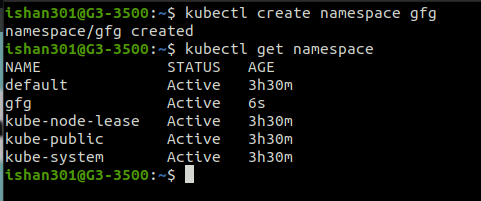
You can create your namespace by using the command:
kubectl create namespace your-namespace

As you can see we have successfully created namespace gfg.
Creating Component in a Namespace
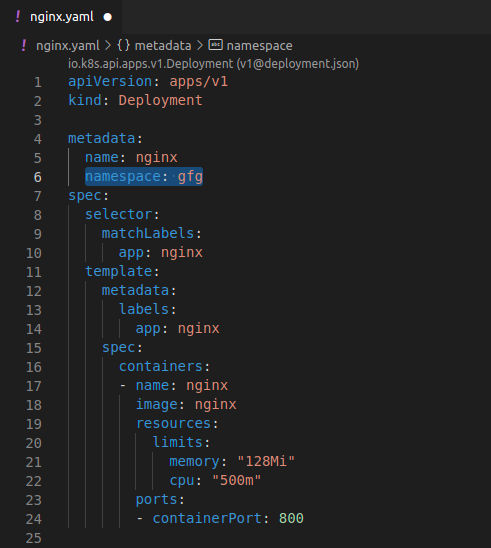
To create a component in a namespace you can either give the –namespace flag or specify the namespace in the configuration file.
The following command is used for deploying your configuration yaml file in a particular namespace Using –namespace flag:
kubectl apply -f your_config.yaml --namespace=your-namespace
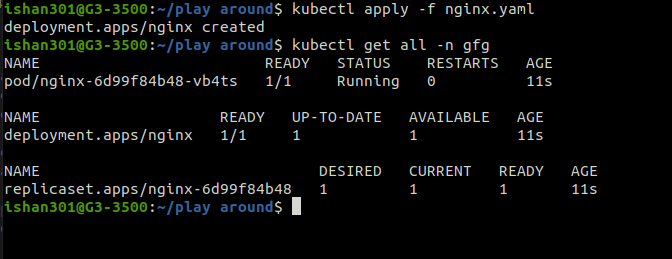
Then you can check resources in your namespace using kubectl get and specify namespace using -n

Create Pods In Specific Namespace
Instead of specifying a namespace using the –namespace flag you can specify your namespace initially in your config file only.

After saving the above yaml code in the file your_config_file.yaml, apply the configuration with the following command:
kubectl apply -f your_config_file.yaml

Difference between Kubernetes Cluster and Namespaces
The following are the differences between kubernetes cluster and Namespaces:
| Aspect | Kubernetes Cluster | Kubernetes Namespace |
|---|---|---|
| Definition | A complete environment consisting of multiple nodes (servers) for running containerized applications. | A logical partition within a Kubernetes cluster to isolate resources and manage access. |
| Scope | Encompasses the entire infrastructure, including all nodes, networking, and storage. | Operates within the boundaries of a single cluster, isolating resources for different projects or teams. |
| Resource Isolation | Provides isolation at the infrastructure level across different clusters. | Provides logical isolation within a single cluster, allowing multiple environments (e.g., dev, test, prod). |
| Usage | Used to deploy and manage containerized applications across multiple nodes and regions. | Used to segregate environments, manage permissions, and organize resources within the same cluster. |
| Access Control | Controls are applied at the cluster level, affecting all namespaces within it. | Fine-grained access control can be applied to specific namespaces, restricting user permissions and resource usage. |
Differences between Namespaces and Context in Kubernetes
The following are the differences between Kubernetes Namespaces and Context:
| Aspect | Kubernetes Namespaces | Kubernetes Contexts |
|---|---|---|
| Purpose | Logical partitioning within a cluster | Configuration setting for kubectl to access different clusters or namespaces |
| Scope | Isolates resources within the same cluster | Defines cluster, user, and namespace settings for kubectl |
| Resource Management | Manages resource quotas and limits within the cluster | Switches between different clusters or namespaces |
| Access Control | Applies role-based access control (RBAC) within the namespace | Determines user access and permissions for kubectl commands |
| Use Case | Ideal for separating environments (e.g., dev, prod) | Useful for managing multiple clusters and user contexts |
Working with Namespaces Commands
Namespaces in kubernetes are a way to create and organize virtual clusters within physical clusters where we can isolate a group of resources within a single cluster. Namespace helps to organize resources such as pods, services, and volumes within the cluster. Workloads of applications and authorization can be managed by using kubernetes namespaces.
1. Viewing Namespaces in Kubernetes
In real-time situations, you will find no.of namespaces that will be used for different applications to list all the namespaces which are present in the cluster you can use the following command.
kubectl get namespaces
2. Describe a Namespace
Use the following command to see more specific information about a particular namespace.
kubectl describe namespace my-namespace
In the above command, "kubectl" is the command line interface in place of “my-namespace” you can use the required namespace you want. You will get detailed information about the namespace such as the namespace name, creation timestamp, and labels associated with the namespace.
3. Listing Pods in Specific Namespace
You can view all the resources present in the particular namespace by using the following command.\
kubectl get pods --namespace=my-namespace
4. Label the Namespace
You can add the label to an existing namespace which is further used to help while creating resources.
kubectl label namespaces <namespace> <labelKey>=<value>
In the place of
5. Delete a Namespace
The following command is used for deleting a kubernetes namespace:
kubectl delete namespace <namespace-name>
6. Setting Default Namespace for Current Context
The following command is used for setting the default namespace for current context:
kubectl config set-context --current --namespace=<namespace-name>
7. Run a Command is specific Namespace
The following command is used for running a command in a specific namespace:
kubectl get pods -n <namespace-name>
8. Setting The Namespace For A Request
Setting up a namespace in kubernetes can be done in two ways one is the imperative way and another is and declarative way means by using the command line of kubectl and by writing a yaml file. as explained in the following commands and code
The following command is used as Imperative way or command line of kubectl for listing the pods in a particular namespace:
kubectl get pods --namespace=my-namespace
This command will fetch the pods from the specified namespace.
The following is an example for Declarative way ( manifest yaml file ):
apiVersion: v1
kind: Namespace
metadata:
 name: <NameSpaceName>
 labels:           # Labels are key value pairs(Metadata)
   <key>: <value>
9. Setting The Namespace Preference
Setting the namespace preference will make the default namespace for API to interact with the cluster. After setting up namespace preferences you can deploy the resource in that particular namespace where you manage all the resources without any confusion. The namespace preference is typically configured on the Kubernetes API server and can be set to one of the following options:
-
Cluster-wide default namespace.
-
User’s default namespace.
To set up namespace preference using the command-line tool kubectl can be done by using the following command. This will be my-namespace as a default namespace.
kubectl config set-context --current --namespace=my-namespace
Benefits of Using Kubernetes Namespaces
The following are the benefits of using kubernetes Namespaces:
-
Isolation of resources for different teams: Namespace will isolate the resources which are going to be used in the Kubernetes cluster. Namespace in Kubernetes is useful for security, performance, or organizational reasons. A namespace can be created for different teams who are going to work on the Kubernetes cluster such as developers teams, testing teams, and other teams.
-
RBAC: Namespaces can increase the security of resources that are deployed by using role-based access control. For example, if the resources are deployed in the dev namespace by using RABAC we control the permissions to the developer team members in that dev namespace in the Kubernetes.
-
Organization of resources: In a Kubernetes cluster it is very important to maintain the resources which are deployed in the cluster in an organized manner it can be done by using Kubernetes namespaces where you can track and manage the resource which is deployed.
-
Increase Performance: Resources that are deployed in the Kubernetes cluster are isolated from each other which will help to reduce the burden on the resources like CPU and memory.